 +971 6 522 6368
  +971-56-994-6523
  info@resalahphysio.com

Hamstring Injury
A Complete, Step-by-Step Patient Guide
If you just felt a sudden sharp pain, tightness, or a “pull” in the back of your thigh while walking, running, or bending over, you might have injured your hamstring. Experiencing an injury can be scary and confusing, especially if you have never dealt with muscle damage before.
This guide is written in plain, easy-to-understand language specifically for you. Whether you are dealing with a mild pull or a severe tear, this comprehensive manual will walk you through what your hamstrings do, what happened inside your leg, how doctors and physiotherapists figure out the problem, and how you can heal completely.
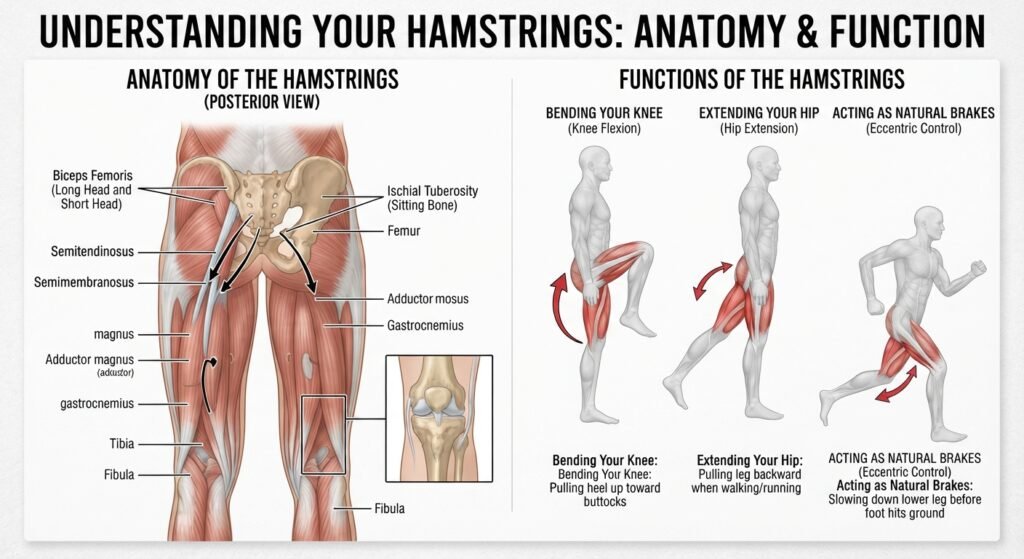
Table of Contents
What is a Hamstring Muscle and What Does It Do?
What Actually Happens When You Injure Your Hamstring?
Common Causes and Risk Factors
What Does a Hamstring Injury Feel Like? (Symptoms)
The 3 Grades of Hamstring Injuries
How a Physiotherapist Diagnoses Your Injury
Immediate First Aid: The RICE Protocol
Your Step-by-Step Rehabilitation Journey
Common Myths About Hamstring Recovery
Long-Term Prevention: How to Stop It From Happening Again
Professional Care at Al Resalah Medical Center
1. What is a Hamstring Muscle and What Does It Do?
Before understanding the injury, it helps to know what is happening underneath your skin. Your hamstrings are not just one single muscle; they are a group of three large muscles located at the back of your thigh:
Biceps Femoris (on the outer side of the back of your thigh)
Semitendinosus (in the middle/inner side)
Semimembranosus (deep underneath the other muscles)
These muscles start at your sitting bone (pelvis) and run all the way down across your knee joint, attaching to your lower leg bones. Because they cross two major joints (the hip and the knee), they do two critical jobs every day:
- Bending your knee: Pulling your heel up toward your buttocks.
- Extending your hip: Pulling your leg backward when you walk, run, or climb stairs.
- Acting as natural brakes: When you run, your hamstrings work overtime to slow down your lower leg before your foot hits the ground.
2. What Actually Happens When You Injure Your Hamstring?
When people say they “pulled” or “tore” a hamstring, they mean that the muscle fibers were stretched too far beyond their limits.
Think of your muscle fibers like a tight bundle of elastic rubber bands. If you stretch them slowly and gently, they stretch and return to normal. But if you pull them apart too quickly or too hard, some or many of those rubber bands will stretch too far, fray, or snap entirely.
When those fibers tear:
Your body immediately senses damage and sends out chemical signals.
These chemicals cause inflammation, swelling, and pain to protect the area.
If blood vessels are torn along with the muscle fibers, blood leaks into the tissue, creating bruising and discoloration (ecchymosis) that can take days to travel down your leg.
3. Common Causes and Risk Factors
Hamstring injuries usually happen during explosive, fast movements, but they can also sneak up on you from everyday habits.
Common Triggers
Sprinting and Running: The most common culprit. Injuries typically happen when your leg swings forward and the muscle has to rapidly contract to slow it down.
Fast Twisting or Kicking: Sports that require sudden changes of direction, jumping, or kicking (like football, soccer, tennis, or martial arts).
Sudden Over-Stretching: Reaching too far for an object, doing a deep split, or slipping unexpectedly.
Heavy Weightlifting: Doing deadlifts or heavy squats with improper form or too much weight.
Hidden Risk Factors (Why it happened to you)
- Muscle Imbalances: If your quadriceps (front thigh muscles) are much stronger than your hamstrings, your knee joint experiences an uneven pull.
- Poor Flexibility or Tight Hips: Tight hip flexors or stiff hamstrings make your muscles less forgiving under sudden stress.
- Fatigue: When your muscles get tired toward the end of a workout, they lose their ability to absorb shock, making them vulnerable to tearing.
Previous Injury: A hamstring that was injured in the past and never fully rehabilitated leaves scar tissue that is weaker and more prone to re-tearing.
4. What Does a Hamstring Injury Feel Like? (Symptoms)
No two injuries are exactly alike, but most people experience a combination of the following signs:
The Sudden Sting or “Pop”: In severe cases, people report hearing or feeling a distinct “pop” or sharp snap in the back of the thigh right when the injury happens.
Pain: A sharp, stabbing, or cramping pain at the back of the leg that makes it difficult or impossible to continue what you were doing.
Tightness: A persistent feeling of deep tightness or stiffness in the thigh.
Weakness: Difficulty straightening your leg, bending your knee against resistance, or bearing weight.
Swelling and Bruising: Noticeable swelling within the first 24 to 48 hours, followed by bruising that may appear days later down the back of your leg toward your knee or calf.
5. The 3 Grades of Hamstring Injuries
Medical professionals classify hamstring injuries into three categories based on how badly the tissue is damaged:
Grade 1: Mild Strain (The Pull)
- What it is: A few muscle fibers are stretched or micro-torn, but the overall structure of the muscle remains intact.
- How it feels: Mild tightness or discomfort at the back of the thigh. You can usually still walk, though it might feel a bit stiff.
- Recovery Time: Usually 2 to 4 weeks with proper care.
Grade 2: Moderate Strain (Partial Tear)
- What it is: A substantial number of muscle fibers are torn, creating a partial tear in the muscle belly or tendon.
- How it feels: Moderate to severe pain, sharp sting upon movement, noticeable swelling, and weakness when trying to bend your knee. Walking with a limp is common.
- Recovery Time: Usually 4 to 8 weeks.
Grade 3: Severe Strain (Complete Rupture)
- What it is: The muscle or tendon has torn completely in half, or has pulled completely away from the bone (an avulsion).
- How it feels: Excruciating pain at the moment of injury, an audible pop, extensive bruising, and an inability to walk or bear weight. You may even feel or see a visible “dent” or gap in the muscle.
- Recovery Time: 3 to 6 months. This type sometimes requires surgical repair, followed by extensive rehabilitation.
6. How a Physiotherapist Diagnoses Your Injury
When you visit a clinic, your physiotherapist will act like a detective to figure out exactly what is going on. The diagnostic process includes:
Detailed History: They will ask you questions such as: What were you doing when it happened? Did you hear a pop? How does it feel right now? Have you injured this leg before?
Physical Examination: They will gently look at and feel (palpate) the back of your leg to locate the exact spot of tenderness, check for gaps in the muscle, and assess your swelling.
Movement & Special Tests: They will gently move your leg into different positions (such as a straight leg raise or resisted knee bending) to measure your range of motion and strength.
Imaging (If Needed): If they suspect a severe Grade 3 tear or a tendon detachment, they may refer you for a diagnostic ultrasound or an MRI to get a crystal-clear picture of the damage.
7. Immediate First Aid: The RICE Protocol
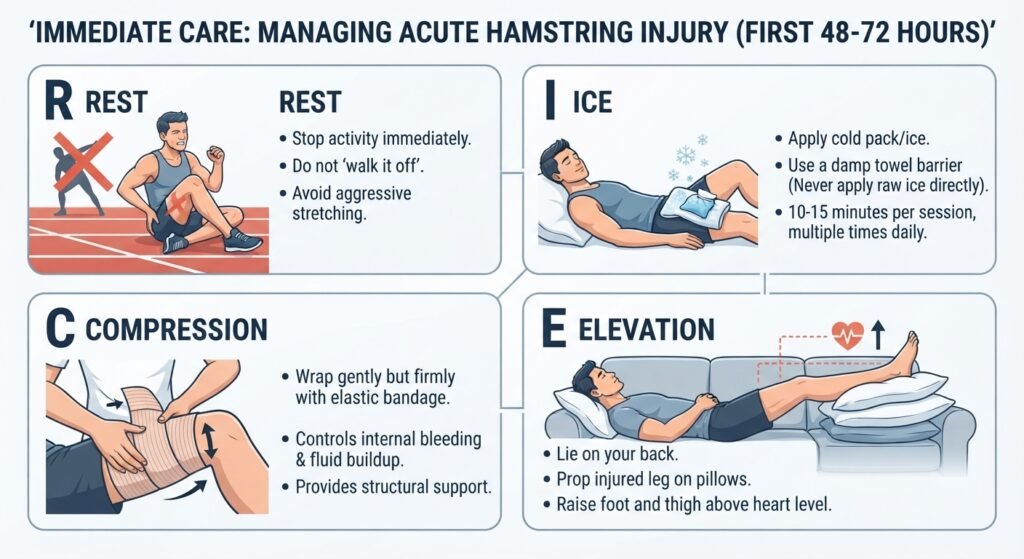
If you just got injured, the very first thing you should focus on is managing the acute inflammation and preventing further damage during the first 48 to 72 hours. Remember the acronym RICE:
R – Rest: Stop what you are doing immediately. Do not try to “walk it off” or stretch the muscle aggressively. Give your leg a break.
I – Ice: Apply a cold pack or ice wrapped in a damp towel to the back of your thigh for 10 to 15 minutes at a time, several times a day. This helps numb the pain and slow down swelling. (Never put raw ice directly on your skin!)
C – Compression: Your physiotherapist or doctor may advise wrapping your thigh gently and firmly with an elastic bandage. This controls internal bleeding, limits fluid buildup, and provides structural support.
E – Elevation: Lie down on your back and prop your injured leg up on a stack of pillows so that your foot and thigh are raised above the level of your heart. This uses gravity to drain fluid away from the injury site and reduce throbbing.
8. Your Step-by-Step Rehabilitation Journey
Once the initial shock and acute pain settle down (usually after 5 to 7 days), your recovery truly begins. Do not skip rehabilitation. Recovering on your own without professional guidance is the #1 reason hamstring injuries come back.
Phase 1: Early Mobility and Pain-Free Movement (Weeks 1 to 3)
Gentle Movement: Complete rest is only necessary for the first few days. Soon, you need movement to encourage proper healing.
Low-Impact Cross-Training: Your physiotherapist may recommend riding a stationary bicycle with zero resistance or walking in a swimming pool. This keeps your blood circulating and takes your leg through a range of motion without putting body weight stress on the healing muscle.
Regaining Walking: Once you can walk without a limp and the sharp tenderness fades, your therapist will guide you through a structured walking program.
Phase 2: Rebuilding Strength and Preventing Scar Tissue (Weeks 3 to 6)
Active Exercises: Your physiotherapist will give you specific, targeted exercises (like bridges, pelvic tilts, and sliding heel curls) that encourage your body to rebuild healthy muscle tissue instead of stiff, weak scar tissue.
Isometric Loading: Contracting your muscle without moving the joint, which safely builds baseline strength back into the fibers.
Phase 3: Advanced Strengthening & Eccentric Training (Weeks 6 to 10+)
Eccentric Strength: This is the secret weapon of hamstring recovery. Eccentric strength means strengthening the muscle while it lengthens (like lowering your body slowly during a Nordic curl). Research proves that eccentric training is vital to bulletproof your hamstrings against future tears.
Core and Hip Stability: Strengthening your glutes, lower back, and core so your hamstrings don’t have to do all the work alone.
Phase 4: Returning to Sport and Running (Weeks 10 to 16+)
Linear Running Progression: You won’t just jump straight back into a full sprint. You will start with a slow “grass shuffle,” progress to short jogging steps, advance to steady-state running, and finally practice acceleration and deceleration drills.
Agility Drills: Single-leg hops, change-of-direction training, and sport-specific movements to ensure your leg is ready for real-world demands.
9. Common Myths About Hamstring Recovery
Myth 1: “I should stretch my hamstring hard as soon as it hurts to loosen it up.”
Truth: Stretching a freshly torn muscle is like pulling apart a healing scab—it tears the delicate new blood vessels and delays healing. Let a physiotherapist tell you when it is safe to stretch.
Myth 2: “Once the pain goes away, I’m completely healed.”
Truth: Pain disappears long before the tissue has regained its full tensile strength. Stopping rehab early is why reinjury rates are so high.
Myth 3: “Surgery is always needed for a bad hamstring tear.”
Truth: The vast majority of hamstring injuries—even partial tears—heal wonderfully with non-surgical physiotherapy. Surgery is reserved almost exclusively for complete tendon detachments.
10. Long-Term Prevention: How to Stop It From Happening Again
Once you are healed, you want to make sure you never experience this pain again. Incorporate these golden rules into your routine:
- Never Skip Your Warm-Up: Always spend 10–15 minutes dynamically warming up your legs with light jogging, leg swings, and mobility drills before playing sports or running.
- Keep Up Your Eccentric Exercises: Continue doing hamstring-strengthening exercises (like Nordic curls or Romanian deadlifts) at least once or twice a week.
- Listen to Your Body: If you feel deep tightness or a familiar “niggle” in your thigh during a workout, stop immediately rather than pushing through it.
How Al Resalah Medical Center Can Help You Heal
Recovering from a hamstring injury can feel frustrating and overwhelming, but you do not have to navigate it alone. Following the wrong protocol or rushing back to activity too quickly can trap you in a painful cycle of repeated injuries.
At Al Resalah Medical Center, our expert clinical team provides thorough, one-on-one evaluations to accurately grade your injury and design a customized rehabilitation program tailored specifically to your body and lifestyle.
Under the expert care of our specialists, including Mr. Shamshad Ali, Sports Physiotherapist, we guide you step-by-step from acute pain relief and swelling management all the way through advanced strength training, running progressions, and full functional recovery.
Don’t let a hamstring injury sideline your life or your favorite activities. Schedule an appointment at Al Resalah Medical Center today and take your first confident step toward a complete, safe recovery.
Meet Our Lead Sports Physiotherapist

Shamshad Ali, MPT
Sr. Sports Physiotherapist
SHA Licensed | 10+ years experience
Shamshad Ali is a highly experienced Senior Sports Physiotherapist with over 10 years of clinical experience in musculoskeletal and sports injury rehabilitation. He is certified in advanced rehabilitation and ANF therapy techniques. He graduated from HNB Garhwal University in 2014 and further refined his clinical expertise at GB Pant Hospital, Delhi.
🌟 “Shamshad’s patient-first approach integrates hands-on therapy with compassionate athlete education — ensuring every athlete reaches functional milestones.”
🎯 Our evidence-based sports rehabilitation programs focus on pain relief, mobility restoration, strength recovery, injury prevention, and safe return to sports activities.